Pages

2/21/2023

Whale Doodle

 If I was still putting Tatties on my baby I would call this a Whale Tattie. But that child is now almost 14 and when tatters make small items to use up extra thread left on shuttles it's also called a doodle. In 2017 I was clearing blue off a shuttle to make some roses. I scribbled the pattern notation on my scrap papers and posted the day's work to Instagram and then it was forgotten about until I got an email asking about the whale and I decided it was time to correctly notate the pattern. I have included it here for you. The original doodle I accidentally cut the large water spout picot when I was cutting off the ends. When revisiting it I cut it again because I thought I did it on purpose, and then remembered the error with my notes. I have just completed the TIAS for the year with Jane Eborall and she used twisted picots and while tatting the doodle from notes to check pattern I thought it would be nice with a slightly twisted picot. But it was late and I needed to get to bed so I posted the doodles and went to bed. Great minds think alike because this morning I awoke to a comment on the picture that suggested a twisted picot. So I added the option to the instructions because it is a great variation. If you tat a whale please give me a shout out. I would love to see yours. 


Click below for a printable PDF, as always, please credit designer. 

3/11/2022

Endrucks

With multiple encouragements I joined the efforts in the Endrucks 1920 project being run by Muskaan and Ninetta Caruso. A lot of different tatters joined the effort early on and it has grown significantly. There is a facebook group for participants. 

I dipped my toes in with a motif pulled from pattern #17. Which I really liked in Lizbeth metallic. I printed Muskaan's Lace Day earrings/Pendant and left the internet behind. :)  After completing the motif I thought it would make a nice snowflake. But I was late to the party on this idea as others before me had already tatted  it up and had variations of work as well. And that pattern is offered as a gift to those who participate in the project. In my distracted skimming and then separation from the facebook group I missed this. 

I sketched out my imaginings and went to work. It ends up being different from the one already dreamed up. My scheme works in one single pass (round) and connects complete motifs around. I'm delighted by this because if I can avoid cut and tie in multiple rounds I am all for it. It cups a bit so it can easily be used for other 3D projects but when blocked the center chains wiggle a little looking like a flower. 


Then I wondered what it would be like to flip the motif and do it inverse. I pictured it out on the computer first and omitted redundant rings and then walked through the pattern working order in my head and then with thread. This one didn't work quite as well the first pass. I need to adjust the side rings connecting the motifs. The cupping on this one was not as useful. It reminds me of a turtle. 

It does make my mind wander on the possibilities of upending other snowflake patterns. 

I ended up cutting open a few split rings,   settling the motifs more naturally and then laid individually tatted split rings into the design to see which filled the gap best. This produced the count I have now. The PDF can be accessed through this link. Many thanks to Muskaan for proofing the Pdf and giving me helpful feedback. 
If you give it a try please don’t hesitate to give feedback. 


5/20/2021

 Just FYI, mostly, I update over on Instagram @corettadeesign.

But I like this for hosting my free patterns and design works. 

But here is some eye candy for the last few quiet months. I finished the TIAs and was delighted with the little fox bookmark. I want to design a rabbit to go with it. Probably because since December when we randomly saw the Uncle Remus Museum on our winter trip with the kids and made sure to stop in on the return trip home. We educated them on the tales as we drove so when we came back they would have some appreciation like my husband and I do from our youth seeing Song of the South. So glad we made it a priority to add to our trip. It is such a neat place and the experience was made all the sweeter by Miss Georgia who guided our tour. I was so grateful when she introduced herself that my kids withheld the fact that our dog is also named Georgia. That's not always received well. 

On the bookmark I made in the TIAS, I had a little error where I swapped the thread colors. So I made another with correct coloring as a gift. 

I love how cute the fox head is sticking out of the copy of the Complete Uncle Remus Tales. We got the original text and my husband has been reading it out loud to the family. In some ways we have had to learn a whole new language. The audio book we listened to in order to familiarize the kids with the stories had modernized text. That was the right choice as an introduction, but I'm glad we got the original text for the home library. 
I then started a project where I really was just trying to make sure I was being creative in some way fulfilling to me each day. That produced a few small tatted motifs. 
3D tatted heart, pattern by Birgit Phelps adapted by @mad.jar.tatting

Rose motif and stitches halved by Inevavae

Shamrock Icedrop from Marti J Copenhaver


Snowdrift Snowflake by the Shade Tree Designer

Flurry Snowflake pattern by The Shade Tree Designer

Clover with thread remnants and no particular pattern

Rose and bud, my patterns. 

Triple Play pattern by Elaine P. Gan

Pattern by inevavae

rose with calyx (my free pattern)

made to replace a lost earring

As well as some crochet projects, I'm still new at it but find projects that help me grow in confidence. 
7 day Sampler Pattern from the Crochet Crowd

Metal crochet pattern from a library book a friend lent me

Shark backpack and mini shark stuffie 

Then I started focusing on making little water colors and other medium sized paintings. Which, now I am learning something I never learned in college painting classes. Varnish and medium. That feels like a glaring omission. Whatever, thanks to the internet I am still learning. 


1/21/2021

TIAS 2021

 Last year I missed the TIAS. It’s been such a fun thing to look forward to in January. It can’t be a small feat to run it and even prepare for it so I don’t blame her for taking a break. But with this weird year we had and moving into a new one still dealing with things I’m glad that TIAS is back. 

I missed the first few days because I was focused on trying to finish a crochet project. And that didn’t even happen because I ended up getting strep throat. So anything above just taking care of my family was too much. Thankfully with antibiotics I am on the mend and I caught up and we are on to day five. 

If you tat and want to join in the fun hop on over to Jane’s Tias https://tatitandsee.blogspot.com 

This year she linked over to a tutorial she and Tim Kaylor put together for starting two colors without a knot. A very slick and sturdy beginning. And while I have done something similar, this is better. 

5/30/2020

A sponge that lives in the sea who goes by Bob

My daughter graduated elementary school this year. She wanted to give her teacher a Spongebob tatted bookmark. Apparently her teacher is a fan. I am not. But that's okay. Of course this was decided with little time to spare and I did ask and look on the tatting groups and forums that I know of. I did see a neat split ring version by Carol Lawecki on Craftree which was very accurate. However I was looking for a more indicative pattern so I decided instead of tracking Carol down and begging her to notate her work I would work out my own. Time was also an issue.

I started tatting yellow squares and then realized he wasn't really square, and modified it to be wider at the top.


It, thankfully, came together pretty fast and I only cut off once, the white shirt row was ring and chains when I decided it would work better as a joined two color effort with floating or thrown rings. 
I would not label this as a beginner pattern, there are things like Catherine Wheel joins, lots of color changes, hiding ends and general positioning of threads that can be tricky to get things going the right direction. This was a picture before hiding all ends. But when family members saw its stringy form in passing they recognized it as SpongeBob so I was pleased with my efforts.  


Obviously this is a free pattern. I have chosen at this point to do long hand directions only. If you have questions please contact me. 

At one point during the school year when I was at the school previous teachers who were recipients of tatted bookmarks were talking about them and my daughter's teacher who is a male commented on wanting a lacy bookmark. He's a jokester and my daughter really enjoyed being in his class this year so I couldn't miss the chance to give a male teacher a bit of lace. 

This was tatted in size 20 Lizbeth thread
colors: 616 Daffodil Medium
692 Mocha Brown Dark
604 Black
601 Snow White
It measures a little over 3 inches tall and 2" wide with arms. I am guessing though as I have given him away and don't feel the need to tat another one at the moment. :)

Also, this pattern has not been test tatted so if you tat it please let me know! Especially let me know if I messed up some where.

Click below for a printable PDF, as always please credit designer. As neither you or I do not own the rights to the character we cannot profit from this design or the use of it. You are welcome to make this item as gifts only.


11/06/2019

Bookworm Paperclip bookmark

A few years ago I was using a tiny notebook 3x3.5 for tatting notes and wanted a bookmark for it.
This little bookworm was born. It is a free pattern, but be kind and please credit designer and share from this source. Please no online sales of complete work bookworm.

R: 6——6 rw
Ch: 5 attach to paper clip and turn by doing half ds unflipped 5 turn again by doing other half of ds unflipped 6 attach to paper clip turn 5 and second half of DS unflipped and cut
I have tied knots at the tip of each antenna as well. 
Pattern by Coretta Loughmiller in September 2015
@corettadeesign

11/24/2018

Poppy Spray

I've wanted to try this Pattern via Muskaan found here  and here for a few years. It takes Mónica Manceñido's Peace and Tolerance Tiny Heart  and modifies it into a flower.
I thought, it's a nice small thing I should be able to put together pretty fast. However, I tried to do it the first time soon after coming out of surgery for my hip. My brain was not yet my own so I couldn’t see the point or keep straight how to do the “R A : 4 - 2½* - 2½ - 4 . RW ” in Muskaan’s notation. So I just did R:4-2-2-4 and it all worked fine so I continued with that, then I joined wrong in the bottom half of the split ring, twice, undid it and thought I got it straightened out only to find I couldn't tighten the ring (because I'd done it wrong again) and snapped my thread. No biggie, as Muskaan says you can do it in three separate motifs so that's kinda what ended up happening on the first flower base. The second one was a few days later off of pain meds and not quite as exhausted. 

I'd never done roll tatting so that was something new to learn. The flower part would be easier with vsp where the roll tatting joins happen instead of picking through tight caps. (Because my caps are very tight.)

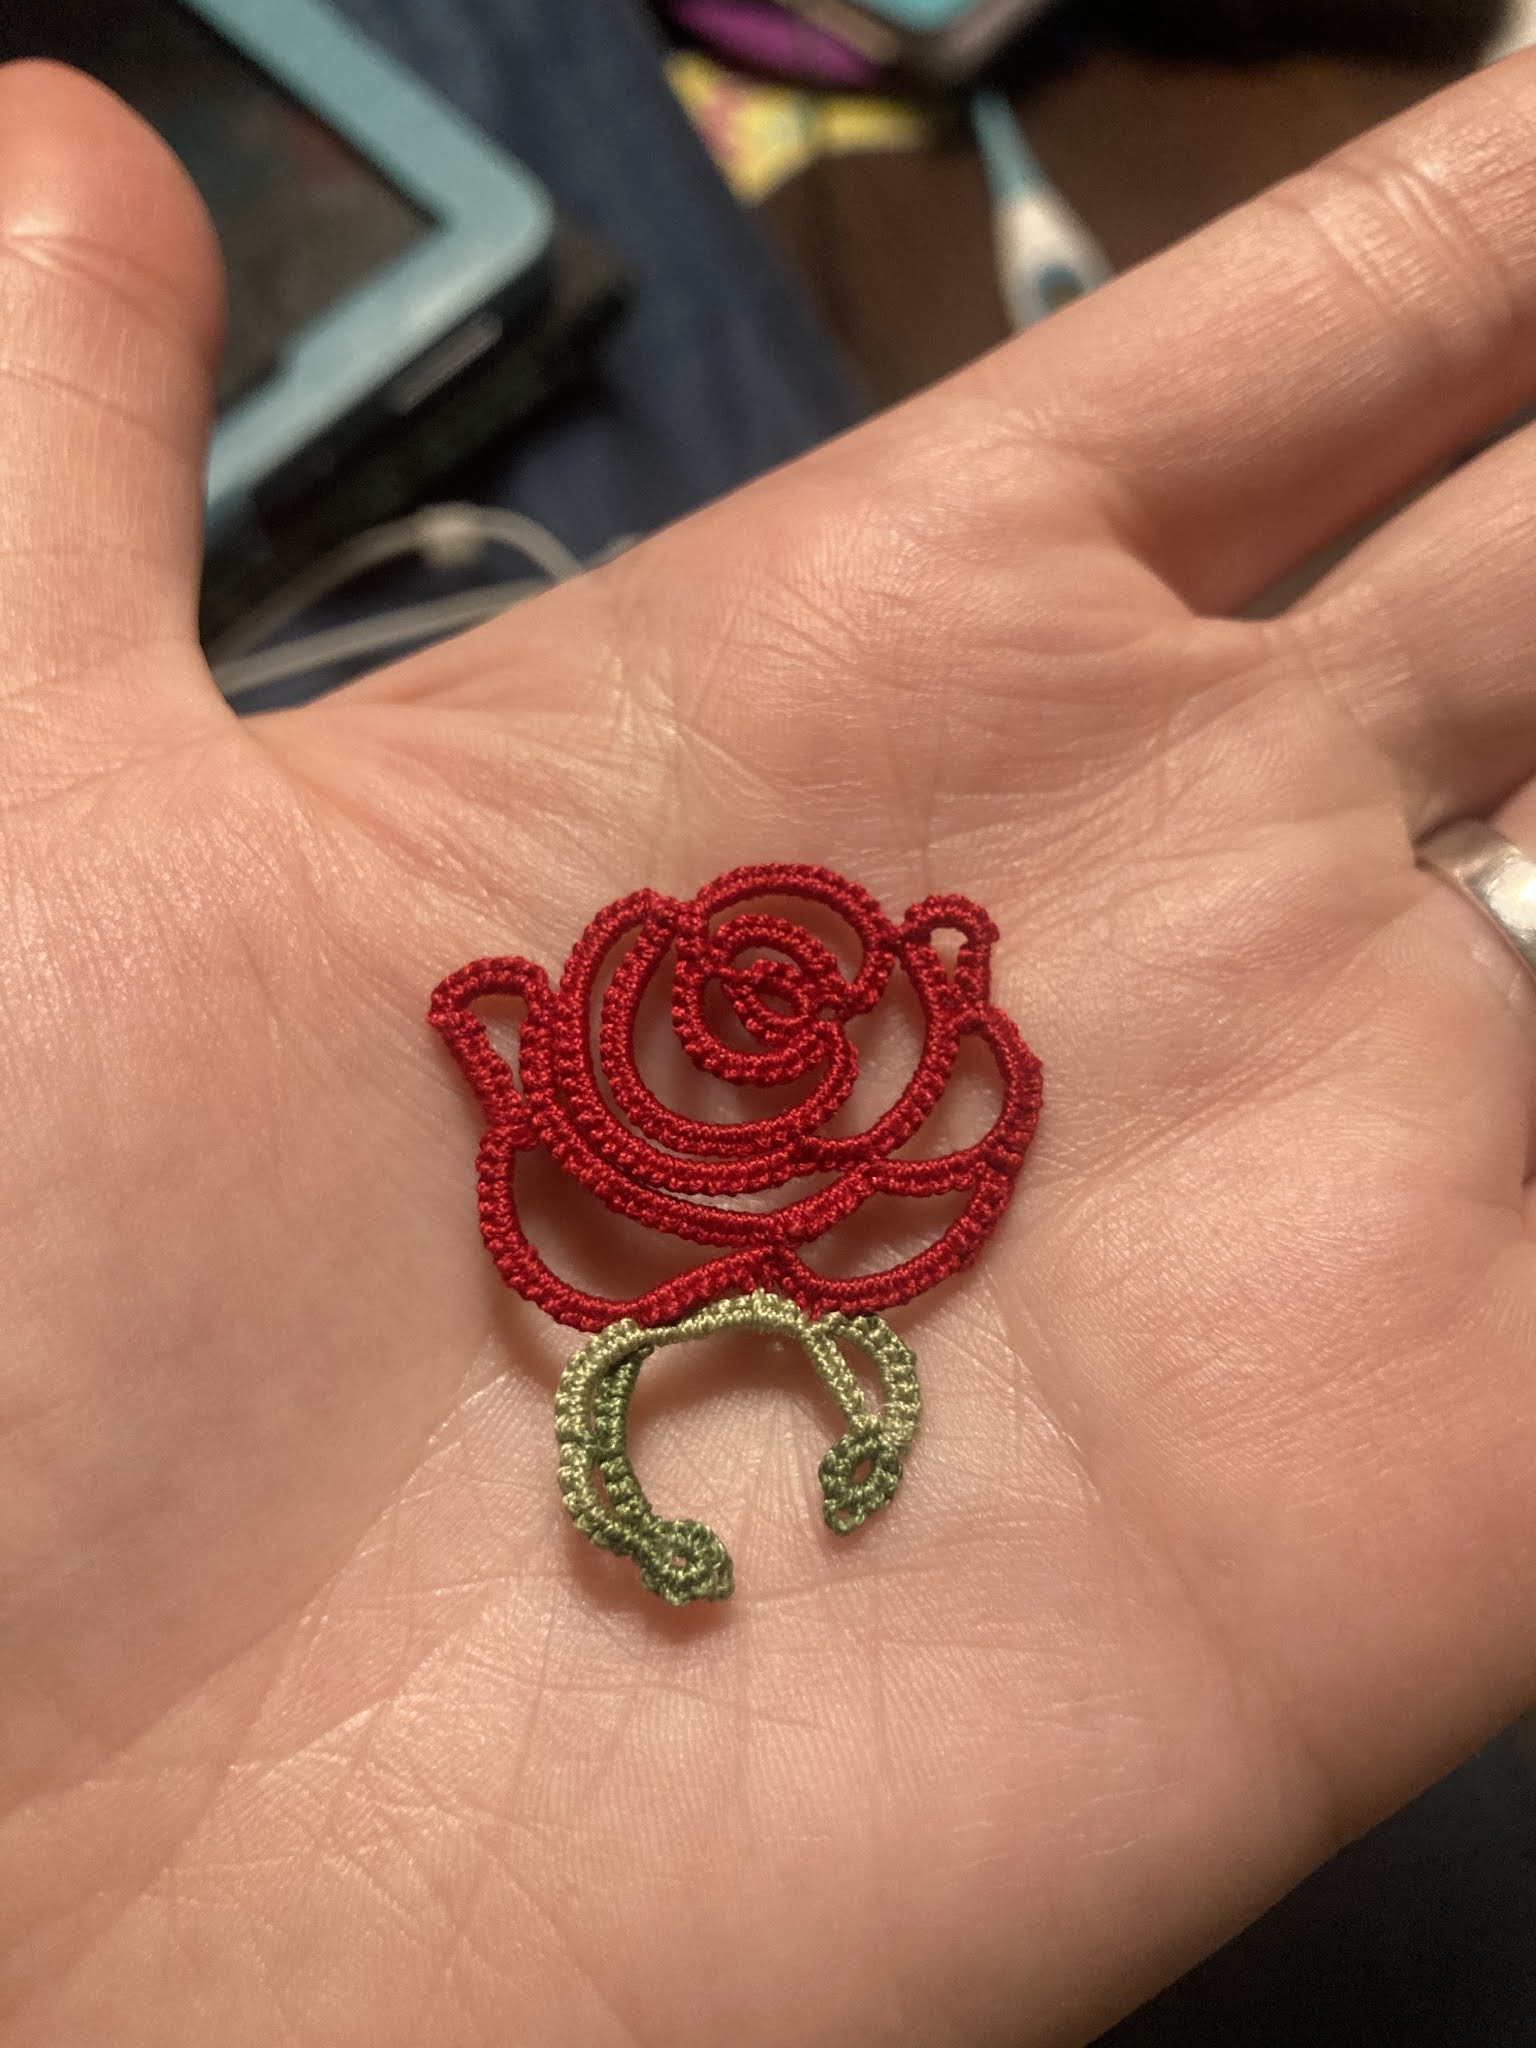
So here is my slight variation. 

Petal 1 –
R A : 4 - 2- 2 - 4 . RW 
Ch : 3 RW
R B : 4 + (to A) 5 vsp 7 . DNRW  SS
Ch :  2 fhs-shs 2 DNRW  SS
R C : 7 vsp 5– 4 . RW
Ch : 3 RW
R D : 4 + (to C) 2 - 2- 4 . DNRW
SR E : 4 + (to D) 2/ join to base of Ring A with Sh2 (to form clover), 4 + (to A) 2 – 3 – 3 . DNRW
1st petal (tiny heart) made.

Petal 2 –
SR F : 2 – 4 / 3 – 3 – 2 – 4 . DNRW
R G : 4 + (to F) 2+ (to D) 2 - 4 . RW
Ch : 3 RW
R H : 4 + (to G) 5 vsp 7 . DNRW  SS
Ch :  2 fhs-shs 2 DNRW  SS
R I : 7 vsp 5 – 4 . RW
Ch : 3 RW
SR J : 4 + (to I) 2/ join to base of Ring F, 4 + (to F) 2 . DNRW
2nd petal (tiny heart) made.

Petal 3 –
SR K : 2- 4 / 2- 4 . RW
Ch : 3 RW
R L : 4 + (to K) 5 vsp 7. DNRW  SS
Ch :  2 fhs-shs 2 DNRW  SS
R M : 7 vsp 5 – 4 . RW
Ch : 3 RW
R N : 4 + (to M) 2+ (to A of 1st petal) 2- 4 . DNRW
SR O : 4 + (to N) 2 + (to E of 1st petal) 3 – 3 + (to F of 2nd petal) / join to base of Ring K, 4 + (to K) 2 .
3rd petal complete.
One poppy flower with 3 petals made. But do not cut thread yet. 
But I did because I got excited... it all worked out, I sewed in my ends and just did a lock join to start the roll tatted edge. See Muskann's instructions for that. 
I followed her instructions for the yellow and black parts too. I lock joined the yellow threads to the base of the red flower in the picots used to join to the black to keep the yellow pistil in place. 
I suggest you make all greenery before combining. I had to stop and cut thread from ball and make more, encapsulate, decide I needed more etc. Encapsulating takes a long enough time as it is. But I also added twisted picots to the encapsulating stem. 

I had done two long bud stems but decided instead to do one long one and other sprays with buds in them. 
I ended up making 
1 bud on long Josephine chain
4 buds with twisted picots on Josephine chains of varying length. 

On my next one I plan to do less greenery but we'll see how it looks before I start combining it. Laying it out before hand I think will be advantageous. 

Then I combine them all through tight encapsulation as I went down in a Josephine chain as Muskaan suggested. I started trimming tails towards the end so it tapered slowly. I ended with a ring with some encapsulated thread and then sewed in the ends. 

I am overly delighted with the look of the large twisted picots. This was a new thing for me. It’s always fun to learn something new to add to one’s arsenal, especially when the learning of it goes easy.They look like Christmas tree pine needles or juniper bushes.
Muskaan's instructions are awesome as usual and super helpful, after getting my brain back I laughed at how confused I was. But the exercise made me make two flowers which will result in two sprays instead of just one. And two is better than one. 

I am just so pleased with how pretty this is. I'm excited to finish the second one. 
And it's the perfect size.


3/01/2018

Tat a Monument in Pink

I don’t have a lot of tatting time. But I wanted to join in this world wide effort. I finally tatted up six squares that met the 3mm requirement after some adjustments to the original pattern.
My first one was too small. So I added a stitch to all counts.

I also tried a pattern designed by Muskaan for the purpose. She has more than this one and there are others people have shared on Cathy’s Facebook page. This one turned out smallest of them all. I just tat very tight. So I added 2ds to all counts to Cathy’s design and arrived at the right size for my tatting. 
For the 6 I sent in I used all the same variegated Lizbeth thread 176 Pink Blossoms. The second one pictured above was tatted with a gifted thread on a spool, I’m not sure what it is, other than it’s not cotton. It is somewhat resistant, where cotton locks in this had a tendency to loosen a stitch, so you’d think it would have turned out the right size since it by virtues of its characteristics made my tatting looser. It was a bit hard to close rings (again because my tight stitches created a bind in the wound (not braided thread) but I did like it. Also I wasn’t doing quite the right join all the time in the center of it so it’s a bit wonky. But all learning experiences to arrive at 6 nicely uniform squares. 


They are of course a drop in the bucket. But they are my drop and they matter.
They arrived at their destination today. 
I snatched the photo from Cathy’s Facebook page of today’s arrivals. Mine is there in the middle far right. 

The deadline has been extended till the end of March. I am consumed by other projects right now but if I have a moment for a small motif I will try to add to my contribution. 

Do you tat? If you do, please consider making a contribution of your tatting. You can see the introductory video here: https://youtu.be/ez-RSEwQvKE 

2/22/2018

TIAS Completed

Here are the last 2 days of my Tat it and see. 


Her body is tatted in Wedgewood Lt 655 Lizbeth size 20
Her hair was remnants from shuttles all Lizbeth size 20

I have started a bunch of new projects and then was sought out for a LARGE project. It’s one I’ve wanted to do but knowing the time investment, as well as it being a large quantity of white work, is making me a bit nervous. I feel like I may have bit off more than I can chew but I don’t have those specifics yet so I will keep busy with Round Robin Doilies.

2/16/2018

Tat it and see

I’ve been participating in Jane Eborall’s Tat it and See game this January. http://tatitandsee.blogspot.com/?m=1  She has put out that it shall be her last year doing it, and while I can understand it, I sure hope it’s not. Her patterns in this form have given me split ring practice when I was new to it and “forced” me to learn other methods along the way in a fun and well paced environment. She’s helpful and responsive. Her other website is a wealth of knowledge and one of my go to places when I forget or need to learn how to do something. http://www.janeeborall.freeservers.com/TipsTechniques.htm

At this point I’m fairly certain we are making a mermaid, but we shall see. If so, mines a bit creepy with blue skin and black eyes. 

I take a screen shot of the pattern page and take a picture of my work completed for each day and collage them together using the app pic•collage. 

So here is my progress day by day so far.